Introduction
A functioning car air conditioning (AC) system is crucial for providing a comfortable driving experience and ensuring optimal visibility. Here's an expanded outline on the importance of a well-maintained car AC system:
The primary function of a car's AC system is to cool the cabin air, making it more comfortable for the driver and passengers, especially during hot weather conditions.In addition to cooling, the AC system also dehumidifies the air by removing excess moisture, preventing the buildup of humidity inside the vehicle.High humidity levels can lead to discomfort, fogging of windows, and potential growth of mold or mildew, which can be detrimental to the vehicle's interior and occupants' health.A properly functioning AC system helps maintain a pleasant and dry environment, enhancing the overall driving experience.

Common Causes for Needing to Recharge Car AC
Before we dive into the recharge process, it's essential to understand the common reasons why a car's AC system might need a recharge in the first place. Here's a table summarizing the most common causes:
| Cause | Description |
|---|
| Refrigerant Leaks | Over time, small leaks can develop in the AC system's hoses, connections, or components, causing the refrigerant to slowly escape. This is the most common reason for needing a recharge. |
| Compressor Failure | The compressor is the heart of the AC system, and if it fails, it can cause a loss of refrigerant and require a recharge after replacement. Lack of use or overheating can lead to compressor failure. |
| Condenser Issues | A clogged or damaged condenser can prevent proper cooling of the refrigerant, leading to low refrigerant levels and the need for a recharge. |
| Normal Wear and Tear | Even without leaks, the refrigerant can gradually deplete over several years due to normal operation and wear on the system's components. |
Let's dive deeper into each of these causes:
Refrigerant Leaks
Refrigerant leaks are the most common reason for needing an AC recharge. These leaks can occur due to various factors, such as:
Wear and tear on hoses, connections, and components
Vibrations from driving on rough roads
Physical damage to the system's components
Even small leaks can lead to significant refrigerant loss over time, as the refrigerant is constantly circulating through the system. If left unaddressed, these leaks can eventually cause the AC system to become ineffective or stop working altogether.
Compressor Failure
The compressor is a crucial component of the AC system, responsible for circulating the refrigerant through the system. If the compressor fails, it can cause a loss of refrigerant and require a recharge after replacement.
Compressor failure can be caused by several factors, including:
Lack of use: If the AC system is not used for an extended period, the compressor can seize up or develop internal issues.
Overheating: Excessive strain on the compressor, such as running the AC system continuously in hot weather, can lead to overheating and eventual failure.
Age and wear: Like any mechanical component, compressors have a limited lifespan and can fail due to normal wear and tear over time.
When a compressor fails, it's essential to replace it promptly to prevent further damage to the AC system and ensure proper cooling.
Condenser Issues
The condenser is another critical component of the AC system, responsible for cooling the refrigerant before it enters the evaporator. If the condenser becomes clogged or damaged, it can prevent proper cooling of the refrigerant, leading to low refrigerant levels and the need for a recharge.
Condenser issues can arise due to various reasons, such as:
Debris buildup: Leaves, dirt, and other debris can accumulate on the condenser, blocking airflow and reducing its cooling efficiency.
Physical damage: Collisions or road debris can cause dents or punctures in the condenser, affecting its ability to cool the refrigerant effectively.
Corrosion: Over time, the condenser can corrode due to exposure to road salt, moisture, and other environmental factors, leading to leaks or reduced cooling capacity.
Addressing condenser issues is crucial to ensure the proper functioning of the AC system and prevent further refrigerant loss.
Normal Wear and Tear
Even if there are no leaks or component failures, the refrigerant can gradually deplete over several years due to normal operation and wear on the system's components. This is because the refrigerant is constantly circulating and can slowly escape through microscopic gaps or seals over time.
To maintain optimal AC performance, it's recommended to have the system recharged periodically, even if there are no apparent issues. The recommended recharge interval can vary depending on the vehicle's make, model, and usage patterns, but it's generally recommended every few years or as specified by the manufacturer.
Diagnosing the Issue
Before attempting to recharge the AC system, it's crucial to diagnose the underlying issue accurately. Here are the steps I typically follow:
Check for Cool Airflow
One of the first things I do is check if the air from the vents is cool or warm. If the air is warm or hot, it could indicate a refrigerant issue or a problem with the compressor or other components.
To check for cool airflow, follow these steps:
Start the engine and turn on the AC system.
Set the temperature to the coolest setting and the fan speed to the highest setting.
Place your hand near the air vents to feel the temperature of the air.
If the air is not cool or cold, it's a clear indication that there's an issue with the AC system that needs further investigation.
Listen for Unusual Noises
Strange noises from the AC system can signify a failing compressor or other mechanical issues. I always pay close attention to any unusual sounds, as they can provide valuable clues about the problem.
Common noises to listen for include:
Grinding or whining sounds: These can indicate a failing compressor or other internal component issues.
Rattling or knocking noises: These may suggest loose or damaged components, such as the compressor clutch or mounting brackets.
Hissing or whistling sounds: These can indicate a refrigerant leak or air in the system.
If you hear any unusual noises coming from the AC system, it's essential to have it inspected by a professional mechanic as soon as possible.
Inspect for Leaks
I carefully inspect the hoses, connections, and components of the AC system for signs of oily residue or stains, which may indicate a refrigerant leak. Even small leaks can lead to significant refrigerant loss over time.
Here are some common areas to check for leaks:
Hose connections: Inspect the connections where the hoses meet the compressor, condenser, and other components for signs of leakage.
Compressor: Look for oil stains or residue around the compressor, which can indicate a leak or internal failure.
Condenser: Check the condenser for any signs of refrigerant leakage, such as oil stains or residue.
Evaporator: While more difficult to access, the evaporator can also develop leaks over time.
If you suspect a leak, it's essential to have it repaired before attempting to recharge the system, as the new refrigerant will simply leak out again.
Check the Condenser
The condenser is often located in front of the radiator, and I ensure it's free from debris and not damaged. A blocked or broken condenser can prevent proper cooling and contribute to refrigerant loss.
To check the condenser, follow these steps:
Locate the condenser, which is typically a large, rectangular component in front of the radiator.
Inspect the condenser for any visible damage, such as dents, punctures, or corrosion.
Check for debris buildup, such as leaves, dirt, or other materials, that may be blocking airflow through the condenser.
If the condenser is damaged or blocked, it will need to be repaired or replaced before attempting to recharge the AC system.
Use a Manifold Gauge Set
One of the most reliable diagnostic tools in my arsenal is a manifold gauge set. By connecting the gauges to the system's service ports, I can check the refrigerant pressure levels and identify potential leaks or component failures with greater accuracy.
Here's a table explaining the different components of a manifold gauge set and their functions:
| Component | Function |
|---|
| Low-pressure gauge | Measures the pressure of the refrigerant on the low-pressure side of the system (evaporator). |
| High-pressure gauge | Measures the pressure of the refrigerant on the high-pressure side of the system (condenser). |
| Manifold | Connects the gauges to the service ports and allows for charging or evacuating the system. |
| Hoses | Connect the manifold to the service ports on the vehicle's AC system. |
By monitoring the pressure readings on the gauges and comparing them to the manufacturer's specifications, I can identify issues such as leaks, blockages, or component failures. This information is crucial in determining the appropriate course of action for repairing and recharging the AC system.
Repair and Recharge Process
Once the issue has been diagnosed, it's time to move on to the repair and recharge process. Here's what's typically involved:

Locate and Repair Any Leaks
If a refrigerant leak is detected, it's crucial to locate and repair it before proceeding with the recharge. This may involve replacing hoses, tightening connections, or sealing leaks with a sealant designed specifically for AC systems.
Repairing leaks can be a time-consuming process, as it often requires disassembling various components of the AC system to access the affected areas. In some cases, entire hoses or components may need to be replaced if the leak cannot be effectively sealed.
Replace Faulty Components
If the compressor, condenser, or other components are found to be damaged or failing, they may need to be replaced by a professional. This can be a more extensive and costly repair, but it's necessary to ensure the proper functioning of the AC system.
Here's a table outlining some common component replacements and their associated costs:
| Component | Approximate Cost (Parts and Labor) |
|---|
| Compressor | $500 - $1,500 |
| Condenser | $300 - $800 |
| Evaporator | $400 - $1,000 |
| Hoses | $100 - $300 |
It's important to note that these costs can vary depending on the make and model of the vehicle, as well as the labor rates in your area.
Evacuate the System
Before recharging the AC system, it must be properly evacuated to remove any remaining refrigerant and moisture. This step is crucial to ensure the new refrigerant is not contaminated and to prevent further damage to the system.
The evacuation process involves connecting a vacuum pump to the system's service ports and running it for a specified period of time, typically 30 minutes to an hour. This process removes any residual refrigerant, moisture, and air from the system, creating a vacuum that allows for a proper recharge.
Recharge with the Correct Refrigerant
Once the system has been evacuated, it's time to recharge it with the appropriate refrigerant type and amount specified for your vehicle. It's essential to follow the manufacturer's instructions or seek professional assistance to ensure the correct recharge procedure is followed.
Here's a table outlining the most common refrigerant types used in automotive AC systems:
| Refrigerant Type | Description |
|---|
| R-134a | A hydrofluorocarbon (HFC) refrigerant commonly used in newer vehicles. |
| R-12 | A chlorofluorocarbon (CFC) refrigerant used in older vehicles, but now phased out due to environmental concerns. |
| R-1234yf | A newer hydrofluoroolefin (HFO) refrigerant designed to be more environmentally friendly than previous refrigerants. |
It's crucial to use the correct refrigerant type and amount specified for your vehicle, as using the wrong refrigerant or overcharging the system can lead to further issues and potential damage.
After recharging the AC system, a leak test should be conducted to ensure the system is holding the refrigerant properly. This step helps identify any remaining leaks or issues that may have been missed during the initial diagnosis and repair process.
There are several methods for performing a leak test, including:
Dye leak detection: A fluorescent dye is added to the refrigerant, and a UV light is used to detect any leaks by illuminating the dye.
Nitrogen pressure test: The system is pressurized with nitrogen gas, and a leak detector is used to identify any escaping gas.
Electronic leak detection: Specialized electronic leak detectors are used to detect the presence of refrigerant molecules in the air, indicating a leak.
If any leaks are detected during the leak test, they must be repaired before the system can be considered fully recharged and operational.
Preventing Future Issues
While recharging the AC system can provide temporary relief, it's essential to take proactive measures to prevent future issues and extend the lifespan of your vehicle's AC system.
Regular Maintenance
Following the manufacturer's recommended maintenance schedule is crucial. This may include periodic inspections, cleaning, and replacements of filters and components. Regular maintenance can help identify potential issues before they become major problems.
Here's a table outlining some common maintenance tasks for automotive AC systems:
| Maintenance Task | Frequency |
|---|
| Cabin air filter replacement | Every 12,000 - 15,000 miles or annually |
| Condenser cleaning | Annually or as needed |
| Refrigerant level check | Annually or as recommended by the manufacturer |
| System inspection | During routine vehicle maintenance |
By staying on top of these maintenance tasks, you can help ensure the longevity and efficient operation of your vehicle's AC system.
Proper Usage
Avoid overworking the AC system by gradually cooling the cabin and not running it continuously for extended periods. Excessive use can put unnecessary strain on the system and accelerate wear and tear.
Here are some tips for proper AC system usage:
Allow the engine to warm up before turning on the AC.
Use the "fresh air" mode instead of recirculating cabin air when possible.
Avoid running the AC at maximum cooling settings for prolonged periods.
Turn off the AC a few minutes before reaching your destination to reduce moisture buildup.
By following these guidelines, you can help minimize the stress on the AC system and potentially extend its lifespan.
Periodic Recharging
Even without leaks or component failures, the refrigerant may need to be recharged every few years to maintain optimal performance. Consult your vehicle's owner's manual or a professional mechanic for recommended recharge intervals.
Periodic recharging can help ensure that the AC system operates at peak efficiency and prevents issues caused by low refrigerant levels, such as reduced cooling capacity or increased strain on the compressor.
Cost Considerations
The cost of recharging a car's AC system can vary significantly depending on several factors:
Labor Costs
If you have the system recharged by a professional mechanic or dealership, labor costs can range from $100 to $300 or more, depending on the location and complexity of the repair.
Refrigerant Cost
The cost of the refrigerant itself can range from $50 to $150 or more, depending on the type and amount needed for your vehicle.
Additional Repairs
If components like the compressor, condenser, or hoses need to be replaced, the cost can increase significantly, potentially reaching $1,000 or more for major repairs.
Here's a table outlining some common repair costs:
| Repair | Approximate Cost (Parts and Labor) |
|---|
| Compressor replacement | $500 - $1,500 |
| Condenser replacement | $300 - $800 |
| Evaporator replacement | $400 - $1,000 |
| Hose replacement | $100 - $300 |
It's important to note that these costs can vary depending on the make and model of the vehicle, as well as the labor rates in your area.
DIY Kits
For those comfortable with DIY repairs, AC recharge kits with gauges and refrigerant can cost between $25 and $100. However, it's important to note that improper recharging can lead to further damage and potential safety hazards.
If you choose to go the DIY route, it's essential to follow the instructions carefully and ensure that you have the proper tools and knowledge to perform the recharge safely and effectively.
While the cost of recharging the AC system may seem daunting, it's generally recommended to have a professional diagnose and recharge the system. Improper handling can lead to further damage and potential safety hazards. Regular maintenance and addressing issues promptly can help prevent costly repairs in the long run.
Conclusion
As an experienced mechanic, I understand the frustration and discomfort that comes with a malfunctioning AC system, especially during hot summer days. The time it takes to recharge a car's AC can vary greatly, depending on the specific issue and the extent of repairs required.
By following the proper diagnostic and repair procedures, and taking preventive measures, you can ensure your vehicle's AC system operates at peak performance for years to come. Remember, regular maintenance and addressing issues promptly are key to avoiding costly repairs and ensuring a comfortable driving experience.
If you ever encounter issues with your car's AC system, don't hesitate to seek professional assistance. A skilled mechanic can accurately diagnose the problem and provide the necessary repairs and recharging services to get you back on the road with a cool, refreshing cabin.
Proper maintenance and timely repairs can not only keep you comfortable but also extend the lifespan of your vehicle's AC system, saving you money in the long run. By understanding the common causes, diagnostic processes, and repair procedures, you can make informed decisions about the care and upkeep of your car's AC system.
Stay cool, stay comfortable, and enjoy the ride!
FAQs
What causes the air conditioning system to blow hot air?
The most common reason is a refrigerant leak. Low refrigerant levels prevent the system from cooling properly.
How can I check for refrigerant leaks?
You can use UV dye or an electronic leak detector to locate refrigerant leaks in the AC system.
What other components can cause cooling issues?
Issues with the expansion valve/orifice tube, compressor/clutch, condenser, cooling fan, evaporator, control module, or blend door actuator can impact cooling.
Why is there a significant difference between low and high pressure readings?
This difference indicates the refrigerant is properly cycling between liquid and gaseous states for effective cooling.
What are typical low and high pressure PSI readings?
Low pressure is usually 30-50 PSI, while high pressure is around 170-250 PSI, but this varies by vehicle.
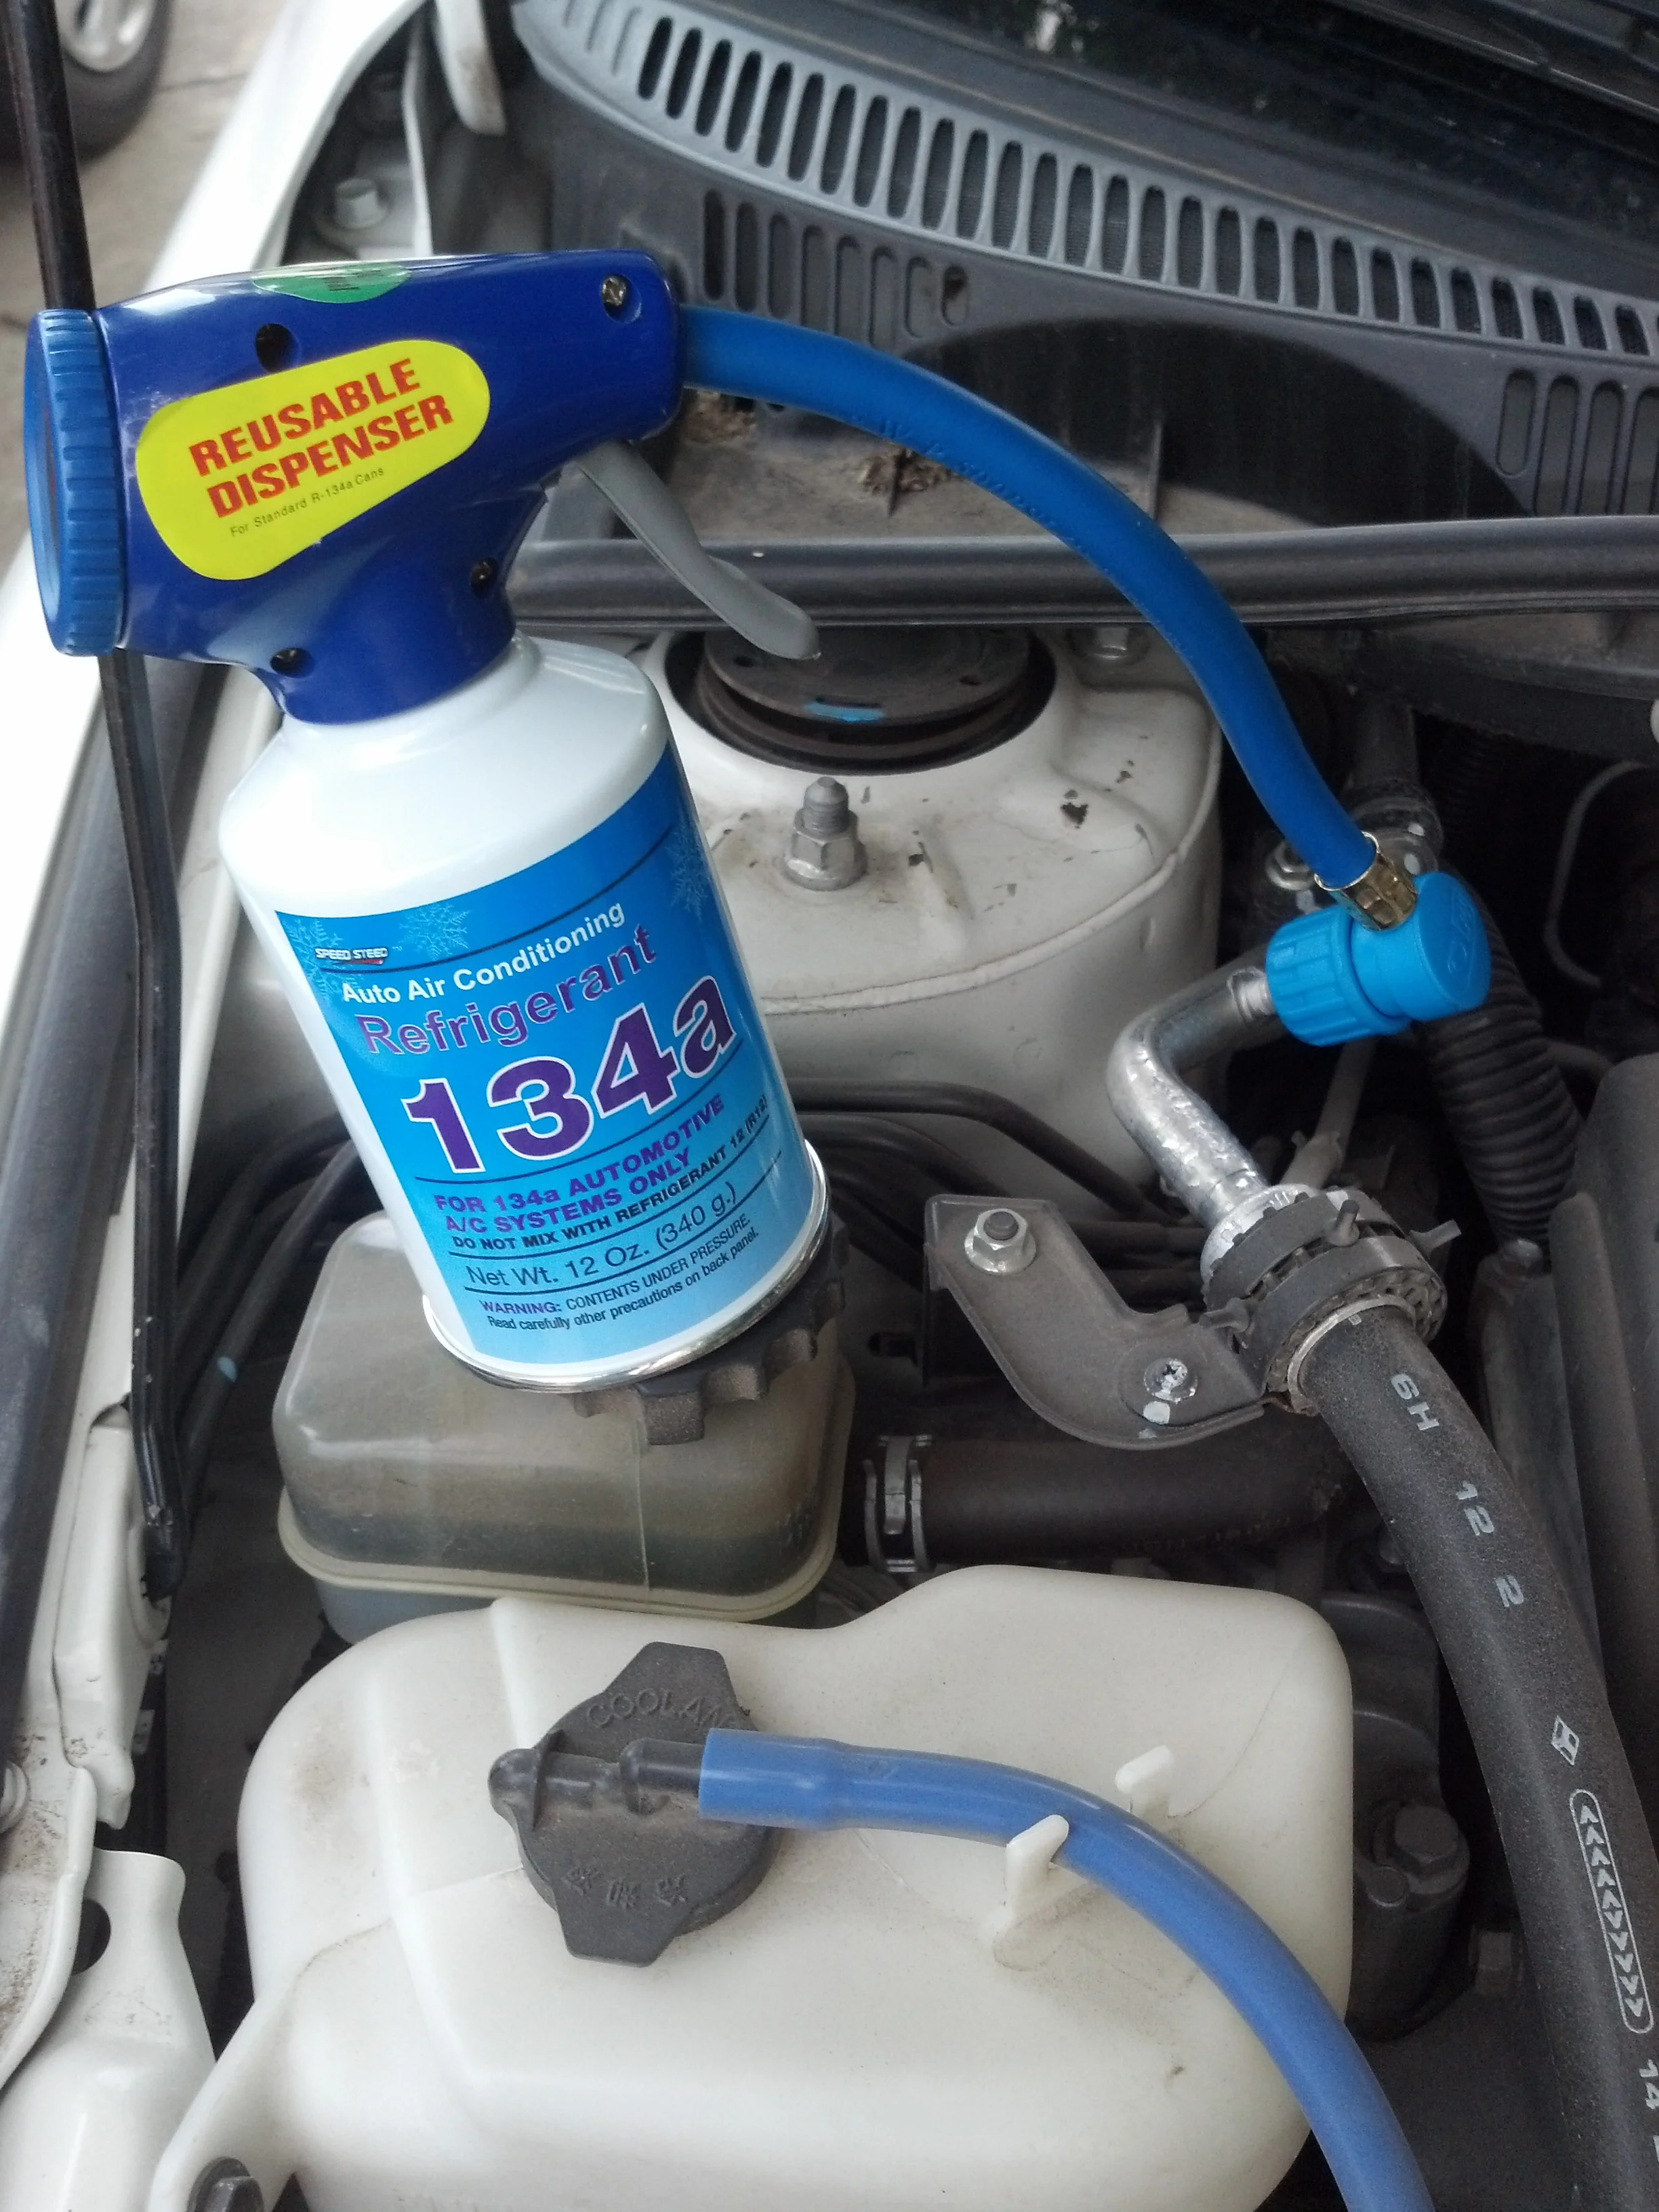
How do I recharge the AC system with refrigerant?
Use a recharge kit to connect the dispenser hose to the low pressure port and add refrigerant until the correct pressure is reached.
Why should I vacuum the lines before recharging?
Vacuuming removes any metal shavings or debris that could damage the new compressor when recharged.
What maintenance helps prevent cooling issues?
Regularly replacing the cabin air filter and following the manufacturer's recommended service schedule.
What causes AC system noises?
Loud noises from under the hood could indicate issues with the compressor, clutch, or other mechanical components.
Why is water leaking from the AC system?
Some water drainage is normal as the evaporator removes moisture, but puddling could indicate a refrigerant leak.